I love it when I get questions from our Learn2Groomdogs.com members. Not long ago, Mishelle H. asked if I could do a blog about tuck-ups. She said, “I’m never satisfied with mine. Skirted breeds or not, just can’t seem to master them.”
It would seem to be a simple question, but there’s no one answer. There are variables depending on many things, including:
- the type of dog you are working on
- the type of haircut
- the type of coat
- the technique you choose to use to establish the tuck-up area
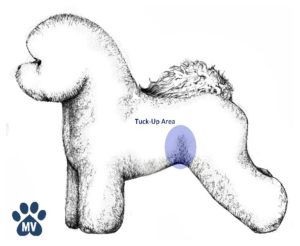 What is the tuck-up area on a dog?
It’s the natural waistline.
The waistline is made up of the loin in the flank. It falls right behind the rib cage and before the rump. Depending on the dog’s build, some waistlines are well-established. Others are barely visible due to bone structure or being overweight.
Ideally, you want to see a bit of a waistline on most dogs. However, that waistline does not wrap all the way around the dog. It’s a pocket just below the loin in the flank area where the back leg joins the body. Depending on the dog’s conformation, this is a key balance point.
A knowledgeable pet stylist can enhance any dog’s physique by proper placement. Improper placement detracts from the overall balance of the haircut. Setting the tuck-up correctly brings harmony to the entire trim. If the pet has enough coat, a talented stylist can give the illusion of a well-defined waistline even if the physique is less than perfect. Incorrectly setting the tuck-up makes a dog look unbalanced and structurally unsound.
 How do you find the tuck-up?
Here are three different ways to find the proper placement for the tuck-up on a dog. There is no hard-set rule as to what is right – or wrong. Choose one or incorporate all methods into your everyday grooming.
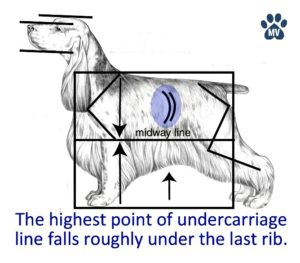
- The Last Rib Method
The highest point of the undercarriage making up the tuck-up falls just below the last rib. Put your hands on the dog. Feel for the ribs. Directly below the last two ribs is typically the highest point on the undercarriage line. This would be the point of tuck-up. Depending on which type of haircut you are working on and the physique of the dog, you might need to carve the area out slightly below the loin in behind the ribs to show off “well sprung ribs.” However, when you look at the dog from top, you will should not see an indentation near the loins on the topline.
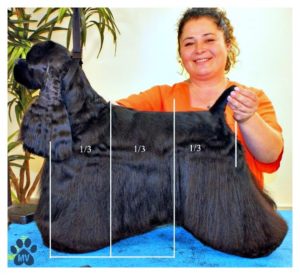
- The Rule of Thirds
Measure a dog into divided thirds. The measurements would be from the point of shoulder to the point of rump. The highest point on the undercarriage line forming your tuck-up will be at the 2/3 point. The rear assembly of the dog will make up the final 1/3. It could be a Poodle, a Setter, or a Terrier. It works on almost any breed carrying coat. When the tuck-up point is set at the 2/3 – 1/3 point, it will balance a dog, giving it a pleasing appearance.
- Use the Stifle to Find the Tuck-up Point
Many professional pet stylists simply use the back leg to measure where the tuck-up should be set. They gently ask the dog to pick up its back leg, pushing it towards its body. The knee or stifle joint will hit right about where the tuck-up point should be set. If it does not touch directly, simply visualize a straight line from the stifle to the body near the last rib. This is your tuck-up area for that dog.
 You’ve found the tuck-up – now what?
How do you scissor it in?
It depends.
Are you dealing with a flowing undercarriage like many Sporting dogs or something that’s tightly tailored as with many of the Terriers? Maybe you’re dealing with breeds that are fully sculpted (such as the Bichon or the Poodle) or even many drop-coated breeds and pet trims.
With long flowing undercarriages, you simply find the highest point and start from there. Most of your active dogs are going to call for a deeper chest. The highest point of the tuck-up will be the shortest part of the drape. It will angle down towards the pastern joints and sweep up into the chest. From the tuck-up into the rear leg, the longer coat will drape accentuating the bend of the knee or stifle joint and sweep either into the foot or the hock joint, depending on the breed.
Many of the long-legged Terrier-type breeds, have just enough coat on their undercarriage to accentuate the depth of chest. The tuck-up point will accentuate a well-balanced dog of substantial build. This type of styling does not leave along drape of coat on the underside of the dog. There’s only enough coat to accentuate the depth of chest. The depth of chest is normally at the level of the elbow. There will be a slight incline from the point of tuck-up towards the elbow, showing off a deep-set chest. From the tuck-up towards the rear leg, the fringe of coat will connect the stifle joint to the body and the rib cage. If you were to back comb the blending line along the lower sides of the dog, it should transition smoothly from the shorter coat on the body. Depending on the dog’s conformation, some dogs will have slightly longer furnishings while other dogs will have almost none. However, almost all of them will have a slight amount of coat in the flank area connecting the tuck-up into the rear leg blending with the stifle.
On stylized longer trims where the dog has a fuller body and even more stylized legs, you will need to scissor in the tuck-up by hand. You can use straight shears, curved shears, chunkers, or thinners.
Lindsey Dicken has a technique that works well with any type of scissor. She calls at the “windshield washer technique.” Once you have established the tuck-up area, you need to carve in a waistline. This waistline will be a little pocket in the flank area only. It does not go into the loin or the back. The purpose of this point is to establish a balanced haircut with a well-bodied dog in physically good shape. The little curved space accentuates the spring of rib and gives the dog the little waistline. It also defines the rear assembly.
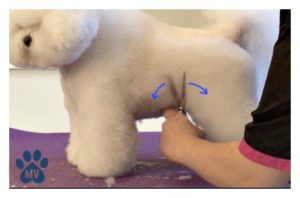 Lindsey’s technique is simple. You place the pivot point of the shear right at the tuck-up area. The screw of the shear will not move. It stays anchored. The tips of the shears sweep back and forth like a windshield wiper. It will create the slight divot of the waistline while blending the stifle smoothly into well-sprung ribs.
For those of you who are Learn2GroomDogs.com members, I have created four Spotlight Sessions featuring the techniques outlined in this blog. I’ve selected different breeds with four different Training Partners as they set in the tuck-ups.
If you’re not a member of Learn2GroomDogs.com, take advantage of coupon code tuckupblog and get 50% off our normal low price of $42 for a one-month subscription now until February 28, 2018. Each month you have unlimited access to over 600 educational grooming videos. Our training partners are some of the top pet stylists in the world – yet every one of them works on every day dogs, just like you, in their salons.
- Setting the Tuck-Up While Shaping the Rib Cage Area on a Kerry Blue Terrier with Cheryl Purcell
- Setting the Underline Area on a Show Styled Bichon with Lindsey Dicken
- The 1/3 – 2/3 Balance Rule: Setting the Tuck-up and Undercarriage on an English Setter with Irina “Pina” Pinkusevich
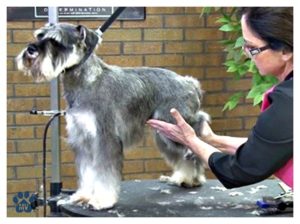
- Establishing the Tuck-Up & Setting the Undercarriage on a Pet Schnauzer with Kathy Rose
Happy trimming!
Melissa

Did this help? What tricks do you use? Jump on our Facebook page and share your thoughts with your Melissa Verplank family.