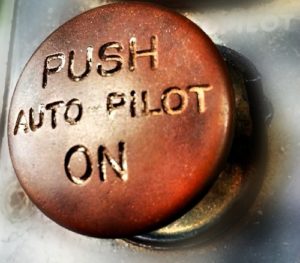
 Grooming systems allow us to go on autopilot. When we’re on autopilot, we can focus on the thing that matters the most – pets!
Think about the things you do every day. I’m sure you use systems all the time. I know I do.
I have a system for making coffee. I have a system for doing my makeup. I have a routine I follow when I exercise. I have a system when I get into the car to go somewhere. I have a routine I follow every night before I go to bed.
I bet you have a lot of routines, too.
When I follow my systems and routines, I don’t have the think about what I’m doing – I just do it. The beauty about routines is they become automated – and efficient.
How does it feel when you don’t follow your routine? What happens when you get interrupted? Do you lose your place? Do you have to stop and think about where you left off? Do you feel lost? What happens to your time?
I know when I’m interrupted, I lose my place. I get off track. I lose precious time. If it continues to happen, I get frustrated.
My guess is you’re just as busy as I am. We have places to go and things to do. Wasting time drives me nuts. How about you?
So, how do you apply this concept to dog grooming? Each phase of the grooming process can be broken down, systematically. For now, let’s talk about a routine for scissoring a leg in less than two minutes.
Now, I’m not talking about an 80-pound Doodle. I’m not talking about a dog you haven’t seen for months. I’m not talking about a dog that comes in matted to the hilt. I’m talking about average, everyday regular clients. Small and medium sized pets that have a bit of style to the haircut.
Let’s break this down.
Let’s say you have a Shih Tzu that comes in every six weeks. It’s heavy coated and gets a medium guard comb on the body with fuller legs and a round head style. When it’s done, it’s so cute it looks like it should be a stuffed animal. The entire trim, prep, bath, fluff dry, and haircut should take 60 minutes or less.
First things first. The set up before you pick up your shears is critical. You’ll give yourself a huge head start if you do a few things beforehand.
All equipment needs to be sharp. Your blades need to be able to glide through the coat like a hot knife through butter. Your shears need to cut effortlessly with precision. Your thinners should run smoothly, without catching. Your Greyhound comb as well as your favorite slicker brush should be within easy reach.
 Here’s my basic grooming routine on all my six-week or less clients who get a fuller styled leg trim.
- trim nails and clean ears
- bath
- towel dry
- hi-velocity fluff drying
- double-check coat for any mats or tangles prior to beginning the haircut
- trim the pads and round the feet at the same time with a #40 blade*
- Sani-work with a #10 (eyes, tummy, and under tail)
- guard comb work on the body*
- scissor the legs
- style the head
- style the ears
- style the tail
- apply bows and cologne based on client preference
I rarely break from this routine. This system allows me to go on to autopilot and focus on the pet and the quality of my work.
Notice the two stars in that list of 13 steps (6 and 8). Those are key areas when setting in the haircut to get legs done in less than two minutes. Those are your “cheat” areas.
What do I mean by “cheat”? Use your clippers. The clipper will remove the bulk of the hair. Any time you can remove excess coat with a clipper, you’re ahead of the game. It minimizes how much you must think about what you are doing while reducing the risk to the dog. #10’s, #40’s or guard combs rarely nick the body of the dog. Scissors? That’s another story. If you’re working with a quality pair of shears, they’re razor-sharp. It only takes one miscalculated move – one tug from the dog – and you have a potential injury that might require stitches. That’s not something any of us want.
Here is my step-by-step guide for this style of haircut focusing on the steps.
(Note: I always work around the dog in the circle.)
Body:
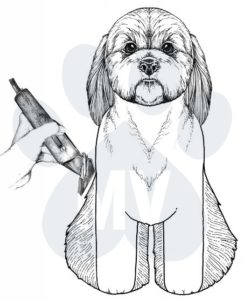
- I brush downward over the leg and the foot with a slicker brush. With my less dominant hand, I slide my hand down the leg, with my finger and thumb closest to the table. When I get close to the foot, I gently ask the dog to lift its foot. I lightly clip the pads with a #40 blade (a #30 blade will work, too).
- Once the pads are clipped, I let my hand slide over the foot with my fingers wrapping around the edge of the dog’s foot. Any coat hanging over the edge of the foot, I quickly remove with my #40 blade. I repeat this process on all four feet.
- Once the pads and feet are trimmed, I turn my attention to the guard comb work on the body. In the pattern transition areas, I let my guard comb skim off the longer hair on the thighs, rump, and the shoulders. I’m thinking about parallel lines.
- When I stand back and look, I want the lines to drop from the widest points on the shoulders and hips to the table. Since the feet have already been trimmed, once you blend the coat at the transition areas, there’s very little left to hand scissor. Normally it’s just an area between 2-3 inches wide.
- Once my clipper work is done on the body and I have smoothly transitioned the short coat into the longer fur on the legs – I’m ready to pick up my shears.
Legs:
 (In this scenario, I’m starting with the front leg and moving to a rear leg but you can use whatever order works best for you – or the dog. As I work around the dog, I complete each leg before moving to the next one.)
- I start with the front legs. I fluff the coat up, gently holding the dog’s foot in my fingers then give the leg a little bit of a shake. The leg is positioned as close to the table top as I can while still elevating it slightly. With straight shears, I box the outside and inside leg lines. (Creating a box is much easier than trying to create a cylinder when setting in the lines.)
- Next, I let the dog stand naturally in a square position. I trim a straight line from the elbow to the table with the dog standing squarely. While the dog is standing, I eyeball the front of the front leg making a mental note how much coat needs to come off to create a straight line.
- I recomb the entire leg, give it a little shake, and begin my final scissoring. With the dog standing, remove the corners and any longer hair falling over the boxed-in area, creating a nice straight cylinder. I then pick up the foot and detail the cylinder shape.
- I quickly give the leg another comb-up and do the final detailing with my thinning shears. I remove any of the high spots or rough patches.
- As I get close to finishing shaping the leg, I slide my fingers in around the top of the elbow, and give a gentle squeeze. This hold stabilizes the dog and naturally makes them point their toes so I can focus on the foot. I give the foot a quick fluff with my comb. Picking up my thinners, I remove any rough edges falling outside of the nice rounded foot blending into the sidelines on the leg. I never cut on the underside of the foot from this position.
- I put the foot down and let the dog stand naturally. I double-check my work between the large pad of the foot and the stopper pad. I re-trim that area if it needs it.
- To double-check the pad area, I brush the coat down and trim any stray hairs with small detail shears – always working around the outside area of the foot pad.
- I double-check all my work before I move on to the rear leg.
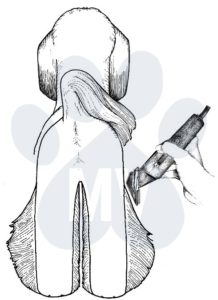 The rear leg will be the same (with a few variances) to help establish the angles of the rear assembly. When doing the guard comb work, I sweep the clipper over the hip and rump area and feather off towards the stifle. This helps establish the angulation on the rear leg.
- On the rear legs, I fluff the coat up. Gently holding the dog’s foot in my fingers, I give the leg a little bit of a shake. With the dog standing squarely, I scissor the outside of the leg in a straight, parallel line to the table.
- Next, while standing directly behind the dog, I scissor a straight parallel line on the inside of the leg.
- I re-fluff the leg and let the dog stand naturally. I scissor in the front of the rear leg, accentuating the curved angle from the stifle to the hock and then straight down to the rounded foot. I will often switch to curved shears for this section.
- Finally, I fluff the rear portion of the leg. Using curved shears, I scissor in the angles over the rump and down the rear section of the back leg, accentuating the angulation.
- I quickly give the leg another comb-up and remove any of the high spots or rough patches with thinners.
- I slide my hand around the thigh, lifting the foot slightly off the table, focusing now on the foot. I give it a quick fluff with my comb and pick up my thinners to remove any rough edges falling outside the lines of the nice rounded foot. I blend the foot into the sidelines on the leg. I set the leg down and double-check the hock.
- I fluff the leg one more time and do one of two things:
- Lift the dog so it is standing on its hind legs. With the dog lifted in this manner, I get a clear view of the inside of the rear legs. I look for rough spots needing to be smoothed out – or –
- Gently pick up the one of the rear legs. Lift it only as high as the dog is comfortable (most of the time allowing the dog to bring its leg into its body a bit). I double-check the inside of the rear leg and smooth out any rough spots with thinners.
- To double-check the pad area, I brush the coat down and trim any stray hairs with small detail shears, always working around the outside area of the foot pad.
- I double-check all my work before I move on to the next leg.
Have you ever timed yourself? If you haven’t, I encourage you to do so. You can’t improve what you don’t track. It’s important to know how long each step of the grooming process takes you. If you are not being able to get legs scissored on a relatively simple trim quickly, I encourage you to grab a timer or watch the clock. Play the time game with yourself. It’s fun. If you work on the system, you will be able to complete a leg in under two minutes.
When grooming pets, I love to automate what I do. It allows me to give the client a consistent haircut every time. It allows me to be efficient. It allows me to minimize the amount of time I spend on each task. I love how having systems in place allows me the freedom to focus on what is important – the pet.
Being efficient allows you to do more pets per day while enjoying your job. It doesn’t mean that you’re working harder, it just means you’re being productive. Think about all the things you do where you have a system or a routine in place. Thorough systems and routines allow you to get through the process effortlessly. And who doesn’t like that?
Creating routines and systems will also increase your revenue generation. I have yet to find anybody who does not appreciate being able to earn more money without having to work harder for it.
 Jump on the Learn2GroomDogs.com Facebook page and tell us your tricks and tips for scissoring legs and saving time.