
 Time is money in our business. Sure, we love pets. I don’t know anyone who gets involved in this career who isn’t passionate about animals. Still – time is money. And in this fast paced world, it never seems any of us have enough of either!
My goal is always to turn a small to medium-sized pet in an hour or less; bathe, dry, haircut, and/or finish-work on a bath and brush style pet.
If you are not turning at least a dog an hour, you have an issue somewhere in your routine.
Here are some ideas/methods that allow seasoned pet professionals to hit that goal. Take a read and see if you can identify ideas you can try to help increase your speed in the grooming department. The times given are for small to medium-sized pets.
Prep-Work: 5 – 15 minutes
- Get the dog to the tub as quickly as possible. In the case of a 6 week or less small pet, 5 minutes would be enough time to do the nails, ears, and privates.
- On a six-week or more pet, you may take up to 15 minutes to do the prep work. Quickly knock off the bulk of the coat to minimize wash and dry time. But still, no more than 15 minutes.
- Leave loose matting alone. Soap, lather, conditioners, and high velocity dryers are magic on a clean coat. It will be much easier to remove in the bath and blow out stage.
- If water cannot penetrate the mat or tangled coat, it needs to be removed prior to bathing.
- Notice trouble areas whether it be dirt, oil, or matting. Pay attention to those areas when you move through the grooming process and handle them when it would be most effective.
Bathing Time: 5 – 10 minutes
- Let gravity do the work when wetting a dog down. For smaller dogs, stand them up and let the water run from their shoulders.
- Don’t worry about getting them TOTALLY soaked if you dilute your shampoo. Diluting shampoo allows for the water to act as a distributing agent of the shampoo, allowing for even saturation.
- If you are working with a shampoo dilution ratio of 15:1 or more – skip wetting the dog down all together prior to applying shampoo. Just apply the shampoo and water together at the same time.
- Apply shampoo in the same order, every time. Let gravity do the work. Start at the back, down the legs, under the tail, ears, and face.
- Use a scrub brush or a rubber curry on very dirty dogs . This works well in exceptionally dirty areas to enhance speed, thoroughness, and ease of cleaning.
- If washing twice, don’t worry about getting every trace of shampoo from the coat on the first rinse, only enough to remove the bulk of the dirt build-up.
- If dealing with exceptionally dirty areas, let ‘em soak a bit before you handle them. Coated faces often have hardened food in them. Tackling them before the food has time to soften causes you too much work and discomfort for the pet. Use a bristled brush, toothbrush, or even a slicker brush for really tough, stuck in food particles.
- If dealing with major mats, utilize a slicker brush in the tub. Just be sure to protect the skin while brushing through the matted coat. The shampoo will aid in making the coat slippery, much like getting a stubborn ring off a finger.
- Use the correct shampoo for the job, especially in the “problem areas.”
- Utilize some sort of squeegee to aid in the speedy and thorough removal of shampoo.
- If the coat does not feel “squeaky clean,” it’s not rinsed well enough. Double check the area for soap residue or cleanness. Unclean coats appear oily when dry and will never allow for a quality finish in the final product. Soap residue can also lead to skin irritation.
- Have a routine that you use to wash every dog and follow it every time. Repeating the same method EVERY TIME builds consistency, effectiveness, thoroughness, and speed.
Drying Time: 5 – 10 minutes
- Squeegee and squeeze as much excessive water off as possible in the tub.
- Utilize a towel magnet to take off the majority of the moisture.
- Use a second towel to wrap the pet. Hold off on areas that do not lend themselves to wrapping. You will not be as effective as possible if there is any water dripping off any portion of the pet, feet, ears, tail, etc. You will also be ineffective if there is a visible spray of water coming off the pet when you do use the high velocity dryer with a condensing cone.
- Turn on your dryer to let it come up to running temperature a few minutes prior to drying the pet.
- If the pet is new to you or seems nervous, introduce the pet to the dryer slowly.
- Once the pet has accepted the dryer, start at either the base of the tail or the withers. Where you start depends on how you want to set up the coat for finish work. Blow the coat so that it lies close to the skin (example: many Terrier or Sporting dogs) or fluffed up for clipper work (most haircut type trims). Next, move to the legs and finally the chest. If the dog allows it, work the head quickly as well. Go over the entire pet first with a condensing cone to remove loose water. Cover every inch of the pet in this manner. If there is a fair amount of moisture still retained in the coat during this process, hold a towel just ahead of where you are working to catch the spray, minimizing how much moisture is passed on to other areas.
- If you are dealing with a curly coated dog, leave the condensing cone on to straighten the coat out, working the shortest areas first, moving into the longer areas and finishing with the head, ears, and tail. Do not move out of a small area until the coat is perfectly dry and fluffed.
- If dealing with a shedding dog or a slightly matted dog, leave the condensing cone on, working in the same order as described earlier. Once the bulk of the moisture is removed, start again at the rump and work small areas until dry and loose coat is no longer coming out. Keep the air flow as close to the body as possible without folding the coat back onto itself.
- If dealing with mats or tangles, use the force of the air to move the mats away from the skin. Stay in one area and move the air slightly, pushing the mats out. Watch the area closes to monitor the progress. It will look like a spider web as you loosen the tangle.
- If dealing with a slightly wavy or straight coated dog, once the bulk of the moisture is removed, remove the condensing cone and hold the nozzle right next to the skin allowing for maximum temperature and lift of the coat.
- If the pet has a long, shedding type coat, remove the condensing cone and place the air close to the pet’s body. Use a heavy brush where the air is flowing to “boost” the rest of the loose, spider webbed, coat out of the pet.
- If dealing with longer coat that will need to be scissored or trimmed with a long guard attachment, “stretch drying” will be needed for additional lift and straightening of the coat. Use a heat dryer and a brush. With very light and rapid strokes, brush only where the air is blowing on the pet. Work against the grain if lift is needed for fullness. Work with the grain if a close lying coat is desired. Use caution – too much heat applied to an area can be painful or even burn the pet. In many cases, only sections will need to be attended to in this manner for optimum quality.
- If you noticed mats still in the coat, finish with stretch drying the areas. Utilizing a heavy brush. Use line brushing techniques from the toes up the leg. Work with very small sections at a time and keeping the touch of the brush very light. Rapidly pat and pull the coat where the air is flowing over the area. Very little heat is needed for this method.
Clipping Time: 20 – 30
- You are never done clipping until there is not anymore coat coming off when the coat is properly set up.
- Three pass passes over the pet and you should have the coat super smooth… anything less than that will reduce time.
- Minimize the amount of movement around the pet. Arrange the pet on the table so that the loop is taut but not tight. Place a small pet crosswise on the table minimizing groomer stretch and maximizing comfort.
- Start your clipper work by standing behind the dog and pull the clippers towards you starting from the neck or withers. If you are reverse clipping, reverse the process by starting at the rear or the dog and work towards the head.
- Handle the bulk of the body first, including the underside if that is to be clipped as well.
- Lift the pet from the haunches to effectively get the undercarriage while still standing behind the pet.
- Move to the side of the pet and work the neck and shoulder areas. Return to the rear of the pet and back brush the entire dog. Repeat process a second time. Back brush once again and check for high spots or rough spots.
Attitude
- Work methodically; be friendly but aloof with the pet. Correct any undesirable action before it becomes a major problem. Accept what you cannot correct and work with it in a calm, cool, and collected manner. Once the job is complete, they you can snuggle with the pet and let it know how much you enjoy your job.
- Always remember the “Three Cs” – Calm, Cool, and Collected. Whenever you forget them, you are wasting time and energy.
 Just like pennies add up to dollars, seconds add up to minutes and hours. Anywhere you can save time without making a major sacrifice in safety or quality, it’s a skill or technique worth learning.
The most indispensable thing any of us can have it time; when it’s gone, it’s gone – never to be retrieved.
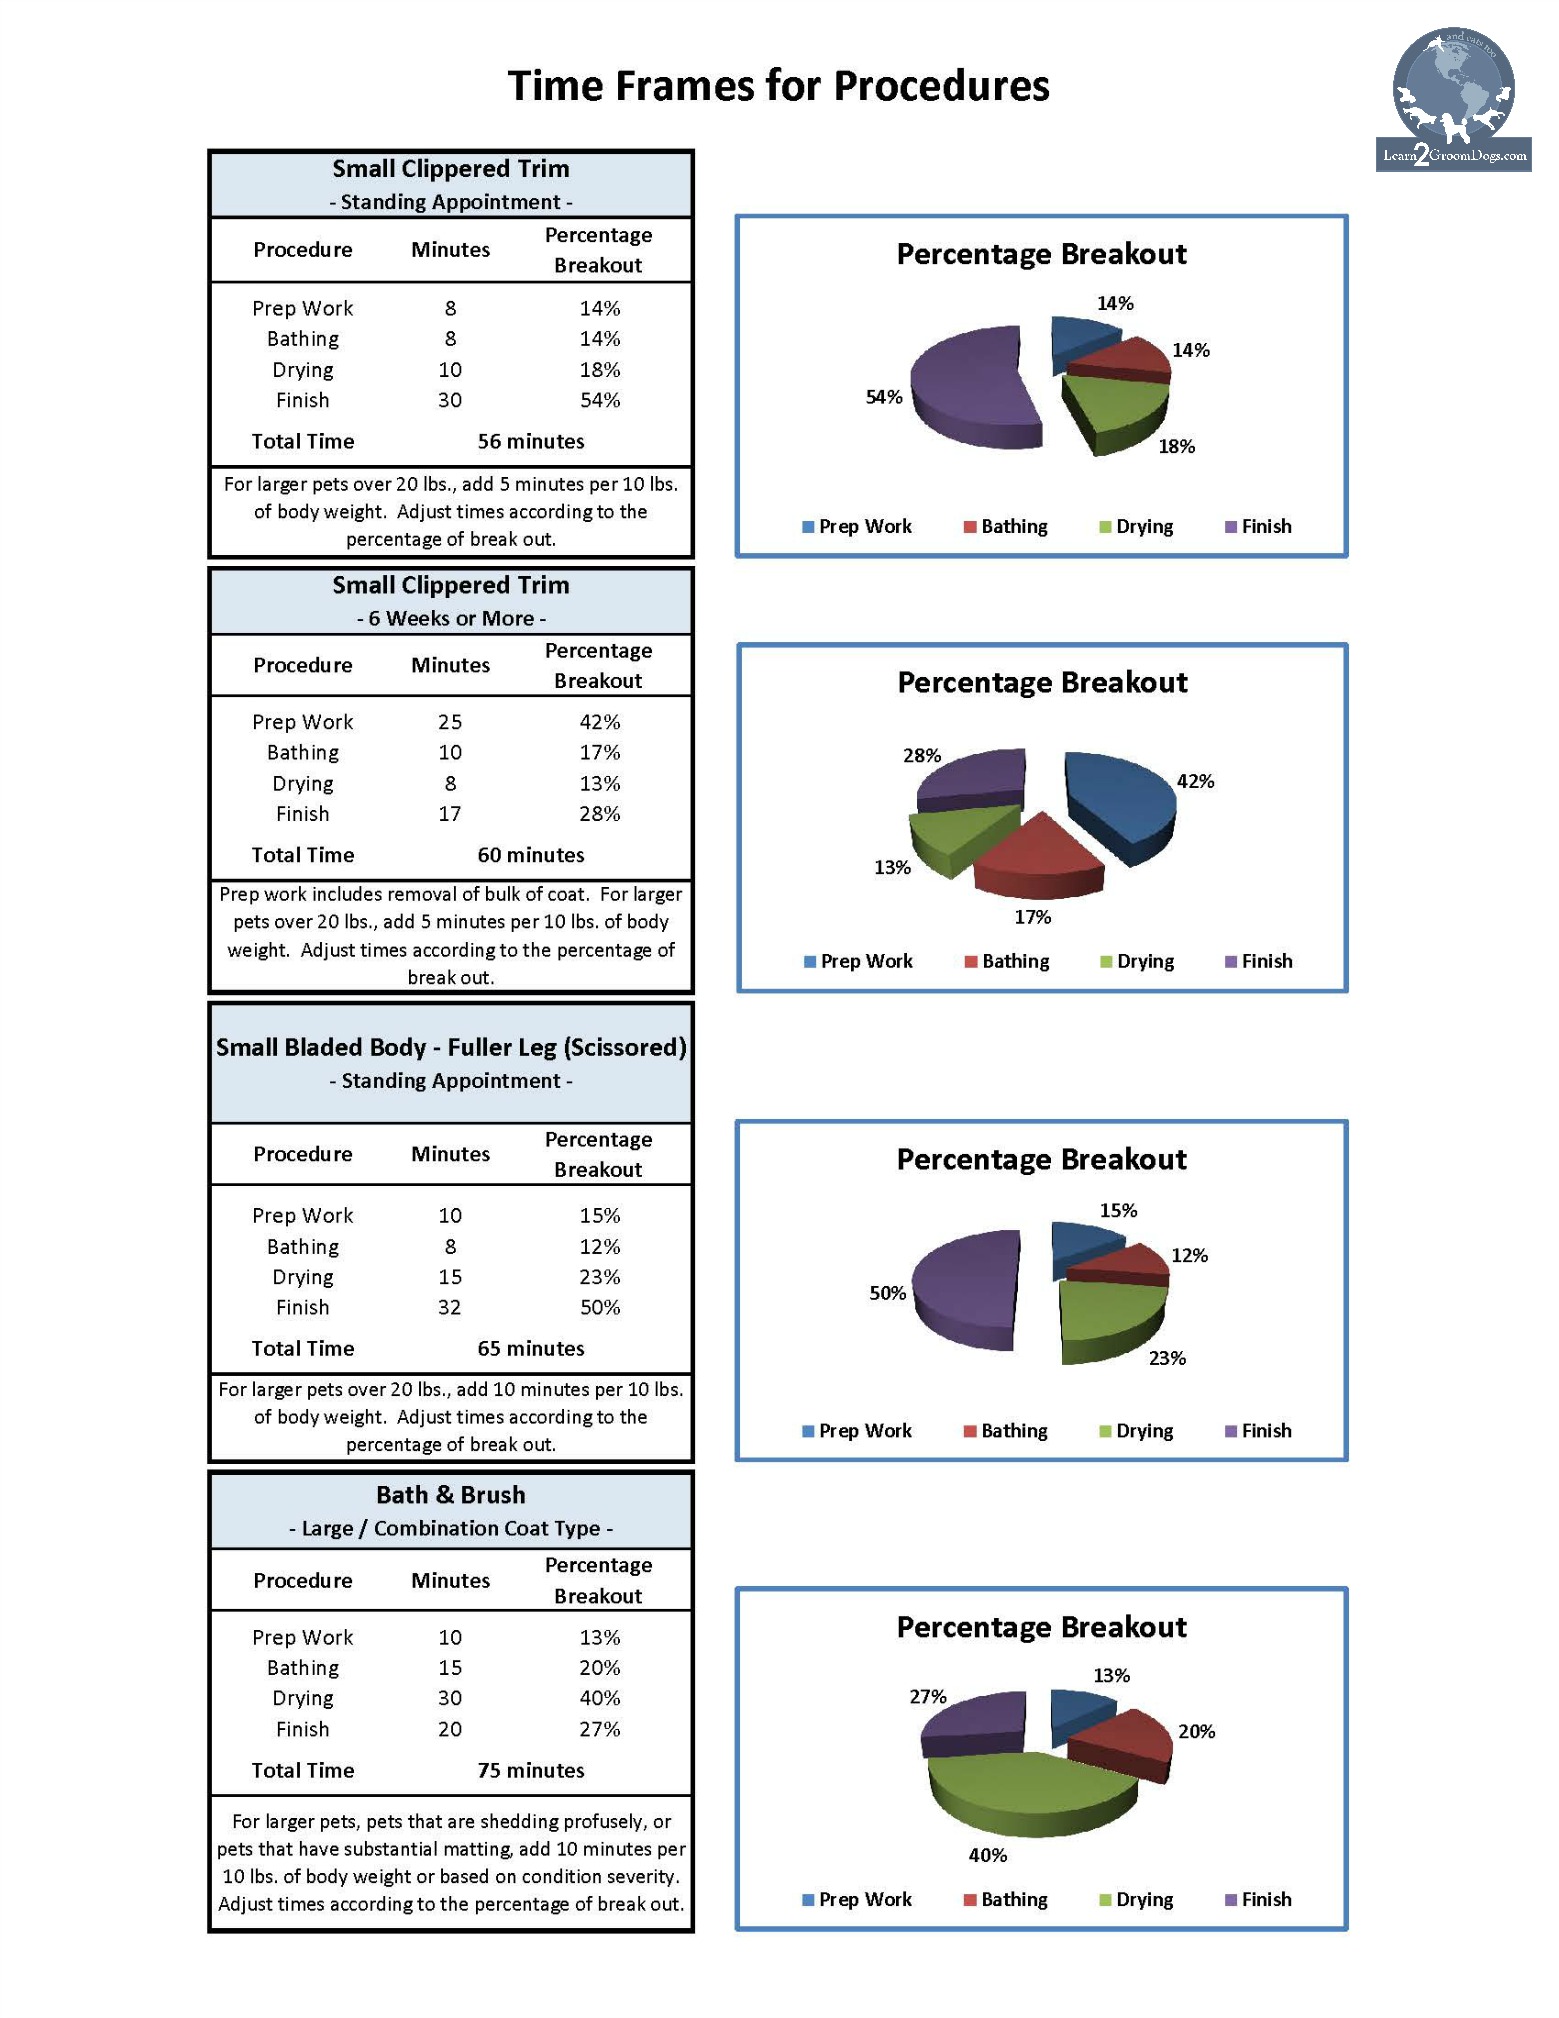 Here is a graphic breakdown of how long each phase of grooming should take. Print off a copy and keep one by your work station to help keep you on track. Click here to download the PDF: Time Frames for Procedures.
Happy trimming,
~Melissa